Discovering the perfumed scent of tuberose in the garden

Polianthes tuberosa, growing in the garden, flowering late in September this year.

It’s been a while since I last posted anything on this blog. Since my last entry, we’ve been in lock down and during this time, I’ve spent more time in the garden, planting for the joy of watching nature come alive.

In May, I planted 5 tubers of the precious Polyanthes tuberosa ‘The Pearl’ in pots. Instructions were simple, put in pots around 3 inches deep in a sunny spot. I put them into 3 pots and waited. I chose them because the scent was described as highly scented and found in many perfumes

Within a month the tubers started to push through the earth and their leaves began to emerge and grow tall. Out of the 3 pots, only one of the tubers I planted showed small buds and bloomed.

In the early morning, brushing past the bloom, it releases a heady scent which I can only describe as sweet, combining the scents of flowers such as irises, roses, lilacs into one floral scent, that feels like sunshine, almost alcoholic as it hits the back of the throat and nose.

Monotheme Tuberose

You’ll find it in Monotheme’s Tuberose Eau de Toilette, a budget perfume that is available in Marks & Spencers in the UK or on Amazon.

For more indulgent luxury, I love the new perfume from Chanel, Gabrielle Chanel.

It has a softer citrus start and includes my favourite scent of Grapefruit, Orange Blossom, Jasmine, Ylang-Ylang, and the rich floral scent of tuberose.

Since the flower has now faded and it’s time to dig up the tuber and store it in a warm place inside the house, it will be a long time before it’s possible to plant it in the garden and watch it grow.

It’s the first time I’ve planted this flower this year, so I’m not sure if I’ll be successful in saving the tubers and getting it to flower again and whether it will be possible to enjoy it’s heady scent in the garden next summer.

So for the time being, I’ll be bringing the sunshine scent back now that the days have grown shorter and colder.

Refreshing herb tea foot soak

This is the easiest recipe to make at home which will revive and refresh tired aching feet. I had all the ingredients in my garden. Better still, the only cost involved was just the use of the pre-made little tea bag pouches which I got online. One hundred of these little pouches ready to fill with tea leaves, herbs or anything which you want to infuse or soak in hot water.

For this refreshing herb tea foot soak, I simply picked a small bunch of mint leaves, a few sprigs of rosemary and some lavender buds which were still flowering in the last days of summer.

A dash of Dead Sea salt, which I already had in my cupboard and a few drops of Peppermint and Lemon Essential Oils, and Orange Blossom Water all mixed roughly together in the tea bag pouch.

Soak in a bowl of boiling water for as long as you want and pour into a warm bowl of clean water. Ready to soak tired weary feet.

I know this seems like quite a bit of effort, but after a long day at work, I like the idea and ritual of preparing something a little indulgent, a little bit of me time to indulge in. The scent is uplifting and has this magical way of transforming the  room into a scented retreat.

Feet are now soaked and feeling light and refreshed. Hmm now for that pedicure, a colourful treat for my toes.

Christmas Gift making – Sweet Orange, Cinnamon and Ginger Beeswax Candles


Last weekend, I decided to make some lovely Christmas gifts to give to friends and family. After a Sunday spent making these lovely gifts, I found myself succumbing to a cold which I have only just shaken off. It meant that I didn’t get round to writing this post until now.

If like me, you like scented candles, receiving one as a Christmas gift would be lovely. I love the gentle glow of candle light, it seems to calm and soothe the senses. I have a small collection of candles from L’Occitane in little metal tins, which gave me the inspiration for this little hand made version.

Making your own filled candles is so easy that I’m now addicted to making them, all you need is to find some containers, flame proof of course and some candle wicks for lighting the candles.

The wicks can be simple pieces of string tied to a stick so that it can dangle down to the bottom of the container (I’ve tried this using chopsticks and a metal Skewer) but it turned out that the cotton string I used didn’t stay alight.

After a bit of research, I found a company that makes ready-made wicks (already inserted into stablisers). They are actually called sustainers. Choose the ones that are pre-waxed and are labeled with the diameter (You need to make sure that the pool of the melted wax goes to the edge of your container) that matches the diameter of your container.

To keep the sustainers from moving, place a small amount of melted wax on the bottom, or if this is a bit fiddly, use Glue Dots – these won’t show as they are transparent.

Once the beeswax has melted in a jug over simmering hot water, add your choice of fragrance to the wax just before you are going to pour them into the containers. Personally, I prefer using essential oils.

I’ve chosen Cinnamon Bark, Sweet Orange and Ginger to fragrance these little candles.  Just add 10 drops of each essential oil into the wax which is based on the dilution amounts in aromatherapy – 30 drops for every 100ml of carrier oil (The quantity I’ve put into the tins is approx 100ml in each tin. I’ve made two tins with cotton wicks and two with Cotton Wicks.)

If you’d like to make the candles as gifts, there’s just enough time to order the materials from Amazon in time to make up a batch.

Heres what you need:

You can get the beeswax from Amazon in the UK here:  or if you are in the US you can find it here.

I also tried them with these wooden wicks from Amazon, they crackle and sound like the crackling of an open fire. Perfect to sit and enjoy with a hot cup of coco at night. If your in the US, you can get these here:

Metal Tins* can be found here in the UK.

You can get them also from Amazon in the US here*.

As these are little, they will make perfect little stocking filler treats.

*Contains affiliate links

Smells and tastes better than it looks – Orange Chocolate and Cinnamon Cake

Orange, Cinnamon Chocolate Cake

This rather messy looking cake, smells and tastes so wonderful because it is full of the warming scents of Orange, Cinnamon Spice and Chocolate.

Having found two 20cm spring form cake tins, this would make a simple sponge layered cake with a thickly indulgent butter cream icing.

Ingredients for the Orange Chocolate cake:

200g Caster Sugar

200g softened butter

4tsp Orange Juice

5tsp Coca Powder

1 tsp Ground Cinnamon Powder

3 Beaten Eggs

200g Plain Flour

2 tsp Baking Powder and the Zest of 2 large Seville Oranges

Orange Marmalade (for the filling)

For the Butter Cream filling:

(I have made this using a Sunflower Margarine as my hubby doesn’t get on well with Cows Milk, and used a dash of Orange Juice)

Icing Sugar (about twice the volume to the butter)

Butter or Marge

Pinch of Salt

Orange Zest

1 tablespoon of Milk/Orange Juice to taste and loosen the consistency of the filling to your desired consistency

To make:

Preheat oven to 180 degrees

Mix together the softened butter and sugar until the mixture is light and fluffy. I mixed it together with a spoon rather than used an electric whisk.

Heat orange juice and then mix in 4 tablespoons of the Coca Powder to form a paste and add to the Sugar and Butter mixture, add the rest of the Coca Powder into the mixture and mix until all the ingredients are combined.

Beat in the 3 whisked eggs a little at a time until the mixture has combined to form a batter like mixture.

In a bowl add in the Strong Flour, Baking Powder Cinnamon and Grated Zest of Orange and combine. Sift this mixture into the batter like mixture and gently fold into the mixture until the two have combined into a thick cake mix.

Divide evenly between 2 Cake Tins (20cm wide). I have lined these with Grease proof paper, to help ease the cake out of the tins.

Bake in the oven for about 25-30 minutes. You’ll know the cake is ready when you put a skewer through and it comes out clean.

Cool the cakes on a baking rack.

I found a tip in one of Delia’s recipe books about how to remove cakes from a spring form cake tin. Put the cake on top of a tin can and push the side of the cake tin down, it should slide off the cake, leaving the cake on the base. Use a pallet knife and gently remove from the base of the tin.

Put a tea towel over the baking rack so that you don’t get lines on the cake. (I didn’t do this bit as I thought the lines would be inside the middle of the cake.

It will take about 20 minutes for the cake to cool completely.Slice of Orange Chocolate Cake with Cinnamon

For the Buttermilk filling – I made this orangey by grating the zest off another orange and adding this to the marge. Combine in Icing sugar and keep mixing/adding icing sugar until you get the consistency you want for the cake. I added a splash of orange juice as well as some Soya Milk to make the consistency a little gooey.

Once you have the filling made, spread a thin layer of Marmalade on each side of the cakes and spread the buttermilk filling on top. Sandwich the cake together, dust icing sugar on top and the cake is ready to serve.

For people who like to decorate, the cake would look great with butter icing on top and some of those jellied orange segments or fresh oranges to decorate. But I was too eager to eat the cake, so were the kids, so it just got a coating of icing sugar before being served for last night’s tea.

Hmmm delicious!

A window renovation that turned into a room revamp

Bedroom Update (3)About a month ago, I decided that our windows were in need of repair. Seriously, they looked really bad and although neither I or my hubby were great at DIY, something had to be done as I was convinced the windows would fall out in the middle of one night.

So, with the purchase of some wood primer and white satin wood paint for wood, I started to sand down the windows. If you own an older property, you’ll understand what a relentless task it is to keep up with all the repairs that are needed.

As I painted, there were big gaps between the leaded windows and the wooden frames which needed to be filled. This was somethng I’d never done before, so looking up on YouTube I found an instructional video on how to put linseed oil putty into wood framed windows. Of course it looked easy, but was actually very fiddly. In the end, I managed to patch-up most of the big gaps, but there are a few that I haven’t managed.

Bedroom Update (5)Once painted, the windows looked fresh and clean, in stark contrast to the room which hadn’t been decorated since we first moved in over 10 years ago.

Lots of other jobs around the house had taken priority, namely my kiddies rooms first and a major extension to the side of the house to fit our growing family needs.

So, now whilst looking for the linseed putty in the DIY store, I mentioned to my hubby about getting some paint for the ceiling, where some of the paper had started to peel away and looked as if it was ready to fall.

At this point my thoughts were to just glue the paper back in place. My hubby had other ideas, he decided the paper had to come down.Bedroom Update (8)

If you’ve ever moved into a house and started to take paper off, only to find layers of paper underneath, this is bascially what we found underneath the first layer of paper. Seriously WHO puts embossed paper over more embossed paper?

So, with limited options financially, we couldn’t afford to get a decorator in. It meant painting over the ceiling to at least cover up the unsightly stains and ripped paper and bare plaster in places.

This of course meant that the walls looked tired and grubby as well. So a fresh coat of paint was needed here too.

It was actually choosing the paint colour that took the longest time.

Hubby wanted a big change, contrasting dramatic colours. Of course that would be ok if we could afford to change our drapes.

Personally I would have preferred an off white, simple neutral backdrop for our dark wood furniture. But marriage is about compromise, being in harmony.

So in the end we did choose colour, a sunny yellow for most of the walls, (my choice) with a dramatic strong accent wall colour in Teal. (Hubby’s choice)Bedroom Update (2)

Against this Teal, I think the dark wood sleigh bed looks great. (An investment purchase we made before the kids became our priority).

As for the windows, we couldn’t afford to replace the drapes or roman blinds that had been badly stained by spots of mildew from all the condensation comming off the wooden windows. I cleaned them and aired them outside in the garden. They look ok, since they were chosen for their period, vintage feel, my reasoning being if they were never trendy or in fashion to begin with, they wouldn’t look out of place with changing fashions or trends in interior design. I don’t think they’ve aged too badly.Bedroom Update (1)

There’s still a lot of work to be done of course. I’m looking out for some lovely containers to make some scented candles to fill the room with Ylang Ylang and Jasmine, scents that will remind us of our honeymoon.

Let me know if you’ve opted for strong colours in your home schemes.

Beauty Haul – 3 high-street finds for hair and skin


L'Oreal EverRiche Exilir for Hair1. EverRiche Perfect Elixir Mask Spray

Boots and other leading chemists.

Last weekend, I went shopping to replace a few skincare and haircare items that I’d run out of.

My hair, has become dry and lost some of its shine. Perhaps it’s my season of life, perhaps it is also the change in the light, the change in weather as Autumn slips slowly into Winter.

We’ve also had a whole week of dreary rain and my hair looks and feels tired and brittle, no doubt from blow drying and styling it with a hot hair dryer.

I’ve been using the shampoo and conditioner by L’Oreal, which is sulphate free, in my search for hair care products that don’t strip hair and scalp of natural oils.

If you have dry itchy scalp as I once had, switch to a shampoo and conditioner without Sulphates.  It is the best thing you can do for your hair and scalp.

After getting the shampoo and conditioner, the 3 for 2 offer in Boots was just too hard to resist. This meant the EverRiche Perfect Elixir Mask Spray for dry hair was added to my basket. I must admit it is a pleasure to use both in terms of the way it smells (It reminds me of almonds and vanilla) and the softness of my hair.

It also keep the hair smelling fresh.  In terms of shine though it is only a little improved.

2.Jojoba OilHolland & Barrett Jojoba Oil

Holland & Barrett

Looking around the high street, in both high-end department stores and pharmacies, I am overwhelmed by the amount of products on display. There are so many, each boasting of their abilities to add moisture, tighten skin, reduce wrinkles or cellulite and more, the claims seem so enticing.

To get everything, would involve a major dent in my budget, not to mention the trouble fitting everything into my bathroom.

One thing struck me though was a lot of the products on display were oils – for face, body and hair.

In Holland & Barrett, I came across pure Jojoba Oil, not listed as an ingredient in a product, but simply the pure oil. It was a bit more than I wanted to spend.

However, as it is a multipurpose oil that is so close to the natural oil produced by our own skin – Sebum, I decided that this would be a good investment as an oil that would be multi-tasking for skincare as well as hair care remedies, from stretch marks to cuticles.

I’m already benefitting  from just a few drops of Jojoba applied to my face before putting on a night cream. My skin feels softer, and pores seem more refined.

Because the composition of the oil is similar to natural sebum, it will regulate sebum production by tricking your skin into thinking it already has produced enough sebum.

Since I’ve always had a rather shiny T area, this is going to be helpful in reducing the shine. It involves just using a couple of drops rubbed in my palm to distribute it evenly across my forehead and around my nose.

WIlkinson Argan Oil3. Argan Oil

Wilkinson

My best find was the Argan Oil in Wilkinsons of all places! This bottle was just £2.50, and even though it’s plainly packaged, it is an oil that’s in a lot of trendy new products at the moment. With plenty of natural skin and benefits, I’ll be trying out a few skin and hair remedies with this oil.

Will share with you as soon as I’ve worked out how to include in a hair styling spray to replace the commercial one that I’ve been using.

Easy Tray Baked Salmon with Roasted Veg

image

We decided to treat ourselves this week to wild salmon.

Most of the time, it’s much more economical, if you are cooking salmon to go for the farmed kind of salmon. It is better for the environment, particularly if you select the type of farmed salmon that comes from responsible, sustainable fisheries. But this time, we treated ourselves to the wild variety, still from sustainable sources, which means that when the fish is caught, it is done responsibly and does not deplete the stock of wild salmon in the rivers.

Wild salmon has a different texture to farmed salmon, the flesh is denser and there is less fat, I think it’s because the fish have been swimming in the wild and are exercising a lot more, it’s a little bit special treat on a few occasions.

Some years ago, I learned about sustainable fishing whilst working on a project. It made me think more about where food comes from.

You can visit the website about Forever Fish to find out more about fish and sustainability,  I think we should all try to do our bit, however big or small. Since then we try to choose sustainably sourced fish whenever we can.

Back to the recipe:

This is such a simple dish to make and comes from Jamie Oliver, we first watched him prepare this on telly a long time ago. It’s one of those simple recipes that you don’t really need a recipe book for once you’ve made it and discover how simple it is.

It is so tasty, I wish you could be transported to within the photo to be able to smell the lovely scent of the wild salmon with roasted veg.

In a pre-heated hot oven, (220 c) put a deep roasting tray in with a drizzle of olive oil.

Place two salmon fillets into the tray, season with salt and pepper and lemon juice, on the other side of the tray, place your vegetables into the tray.

I think in Jamie’s original recipe, there are olives, fine green beans, small baby tomatoes, garlic and a small tin of anchovies, but you can use any type of veg as long as it’s been cut fairly small – such as baby sweetcorn to change things up a bit.

It’s the anchovies that make this dish so flavourful, infusing their briny saltiness into the vegetables so that the taste of the sea comes to life.

With all the juices from both the veg and salmon mingled together, this is what makes this taste so stunning.

We like this with french fries or on this occasion, we made these little cubed roasted potatoes, just par boil the cubed potatoes so that they are just on their way to being cooked, put them in a hot tray that’s had some olive oil heating in the oven. Smother them with the hot olive oil and bake with the salmon tray bake at the same time. They may need to be put into the oven ahead of the salmon -about 20 mins for the potatoes, depending on how big the cubes have been cut.

The salmon and veg, should cook in about 10-15 mins (check at around 10 mins) as it depends on the thickness of your fish fillets and how you prefer them – well cooked or just done.

Enjoy!

Banana Loaf with Sour Cherries and a Cinnamon Crunch topping

Banana Loaf with Sour Cherries and a crunchy topping

I’ve been clearing out our grocery cupboard. Every few months, I make an effort to purge our groceries to make sure there is nothing lurking in the back of the cupboard that is going out of sell-by date.

It sometimes reveals some interesting finds.

Today, I found these dried sour cherries. I don’t remember buying these, so it must have been my hubby. At any rate they are about to reach the end of their shelf life. Rather than waste them, I decided to put them to use in a cake.Sour Cherries, bananas, dried apricots

Since I also had some bananas which were going very brown, they were now not so great looking in the fruit bowl but would be perfect for this Banana Loaf.

Ingredients:

75g Dried apricots (dried squishy fruit such as apricots if you have them)

75g Sour Cherries

Zest of 1 lemon

100g Unsalted Butter (softened but not melted)

125g soft brown sugar

2 large eggs (free range if possible)

2-3 large ripe bananas

200g self raising flour

Loaf tin (13x23x7cm)

Loaf tin paper case (optional)

For the crunchy topping: (this is optional)

1 tablespoon soft brown sugar

1 tablespoon butter

1 tablespoon of Rolled Oats

1 teaspoon of Ground Cinnamon

To make the cake:

In a bowl, mix together the Sugar, Butter and eggs. Combine them until it is a soft batter. Add the chopped fruit (apricots and sour cherries) along with the zest of 1 lemon.

Mash the bananas until they are gloopy and runny and add these into the bowl and stir gently.

Add sifted self-raising flour gently, I tend to put the sieve over the bowl and gently tap in the flour, folding in the flour into the mixture. It should look a little lumpy, (making sure that there are no pockets of flour in the mix).

Spoon into the loaf tin as evenly as possible (it will spread out as it cooks).

My eldest made the crunchy topping at school during one of the cookery lessons and she showed my how to make this delicious topping.

To make the crunchy cinnamon topping:

In a Saucepan, gently melt the soft butter and soft brown sugar, add in rolled oats and ground cinnamon, making sure you coat all the oats with the cinnamon and buttery sugar. Once golden brown take off the stove and add small dollops of the mixture over the top of the cake mix that is in the loaf tin. As it cooks the small dollops of oats mixed into the butter and sugar will turn cook with the loaf and give a wonderfully fragrant cinnamony crunchy texture to the cake.

In the pre-heated oven, bake on 160c for about an hour (check around 50 mins to see if the cake is ready). It’s ready when you can put a skewer into the cake and pull it out clean.

This cake can be eaten hot from the oven but can be stored for a couple of days in an air-tight container to keep it moist.

Sunday Spa Feature – Rice and Lemon Skin tone brightening face mask

You can be gorgeous at thirty, charming at forty, and irresistible for the rest of your life.” Gabrielle Chanel

Rice Powder facemask with honey and lemon

Skin Brightening Rice Powder facemask with honey and lemon

My skin is what can only be described as mature, I am fortunate in that I have Chinese skin which doesn’t wrinkle so much, but the signs of age are starting to show. Since Chinese skin is more prone to pigmentation and age spots, I have always used a sunscreen and kept out of direct sunlight as much as possible.

Yesterday, though, in spite of all the sun protection, the little dark marks on my skin seemed more noticeable and there were a few more freckles which must have appeared while we were on holiday. Even though I have been using Clinique’s dark spot corrector and day cream, it looks as if my skin needs more help.

Whilst I like the idea of aging gracefully, with the signs of age acting as markers that define who you are, I think it’s equally important to do as much as possible to maintain healthy looking skin,

Thinking back to a time when I was at home with my mum, she would use rice in many of the beauty treatments she made at home. I think history must be repeating itself, my daughter calls me a hippie because of my enthusiasm for all things home made. I used to think the same of my mum.

So back to the ingredients for the skin tone brightening face mask – Rice is the staple food in Chinese cooking. It is also an ingredient that features in many beauty products. My mother used to keep the rice water (soaking the rice removes the starch to help improve the texture as it cooks), rather than throwing away the starchy water, she would save this and use it as a toner.

It contains PABA, (Para Aminobenzoic Acid) an ingredient you find in expensive skincare products, as well as ferulic acid, (an antioxidant), allantoin (anti-inflamatory) as well as vitamins C and E. In recent studies, it has been proven that rice and ricewater can improve and brighten skin. Some have even reported it can give skin a translucent glow.

As I want to use Rice in a facial, the best way to do this is a face mask using the rice in a powder form, so that all the goodness in the rice can soak into my skin.

I have simply put a small handful of Jasmine white rice into a hand blender pot and whizzed this until the rice has become a fine powder.

Once the powder is ready, add a teaspoon of honey, this is great for skin as well. I like to use this in masks because it will bind and hold the rice powder in place on my skin and act as a moisturiser.

I’ve included a very small amount of lemon juice and grated the skin of the lemon peel, both of which will also have a lightening effect on skin. But on their own, I think would be too harsh on mature skin, so just a teaspoon of lemon juice.

I’ve included some rosewater to make the paste the right consistency (You can add more if the paste is too thick),

Spread the facemask on your face and leave for 15-20 minutes. I love using a face mask on a Sunday morning soaking in a bath whilst the kids are still asleep – there’s just enough me time before the house awakes.

Once you’ve finished with the facemask, wipe away with a warm towel and follow with a facial toner and moisturiser as usual. There’s just one last thing, if you’d like to make your own  Rosewater cleanser and toner in one, click on the link for the recipe.

Home detox

Home made all purpose cleaning sprayCleaning the house is not something I enjoy. I try to avoid it until it becomes unavoidable.

It takes up so much of precious time at weekends that I am left grumpy at the thought that the endless cycle of cleaning has eaten away at the precious time I’d like to spend doing other things with the family.

In an effort to find ways to cut down, simplify and find short cuts, I’ve been looking at a number of blogs.

There are so many hints and tips to help you get through the household chores and I’m beginning to learn by doing.

I came across a number of blogs that recommend using Vinegar and Bicarbonate of Soda and adding essential oils for their antiviral and antibacterial properties and also to remove the smell of the vinegar.

home detox (2)We’ve been using this distilled vinegar from a Chinese Supermarket. It was in the local Chinese Supermarket in Mitcham that we sometimes go to stock up on Chinese ingredients.

The place caters for both those in the catering business as well as for people who are looking for Chinese specialist food and ingredients.

I love the smell of the supermarket and walking round, there are so many interesting things to look at, most of which I have no idea what they are or how to cook with them.

Compared to other distilled vinegar you can get, it is a little different and as it was the one white vinegar we had in the cupboard, I decided to use it, rather than go and buy another one, which I think would defeat the purpose of trying to simplify and cut down on the number of cleaning products around the house.

We bought it to remove limescale from our kettle, and it works really well at this job. I am sure that there are Thai recipes, with lovely sauces to try with this Vinegar, so will look them up for another time.

Since reading a the blogs about how to clean and organise a home, I decided to try making the bathroom all-purpose cleaner from Clean Mamas post – you can read it here. It seemed simple enough, water, vinegar and alcohol. I wasn’t sure though whether it would work without some kind of soap in the mix.

home detox (3)Since I had some fragrance free washing up liquid that had been under the sink, I thought this could be a good option to try. I hadn’t liked it for dishes because I like the smell of citrus when washing dishes, It was pretty good at cleaning though, I just prefer ones with a lemony scent.

With the washing up liquid and the distilled vinegar, I made up the following mix:

1/4 cup of distilled vinegar

1/4 cup of vodka

1/4 cup of washing up liquid

3/4 cup of water
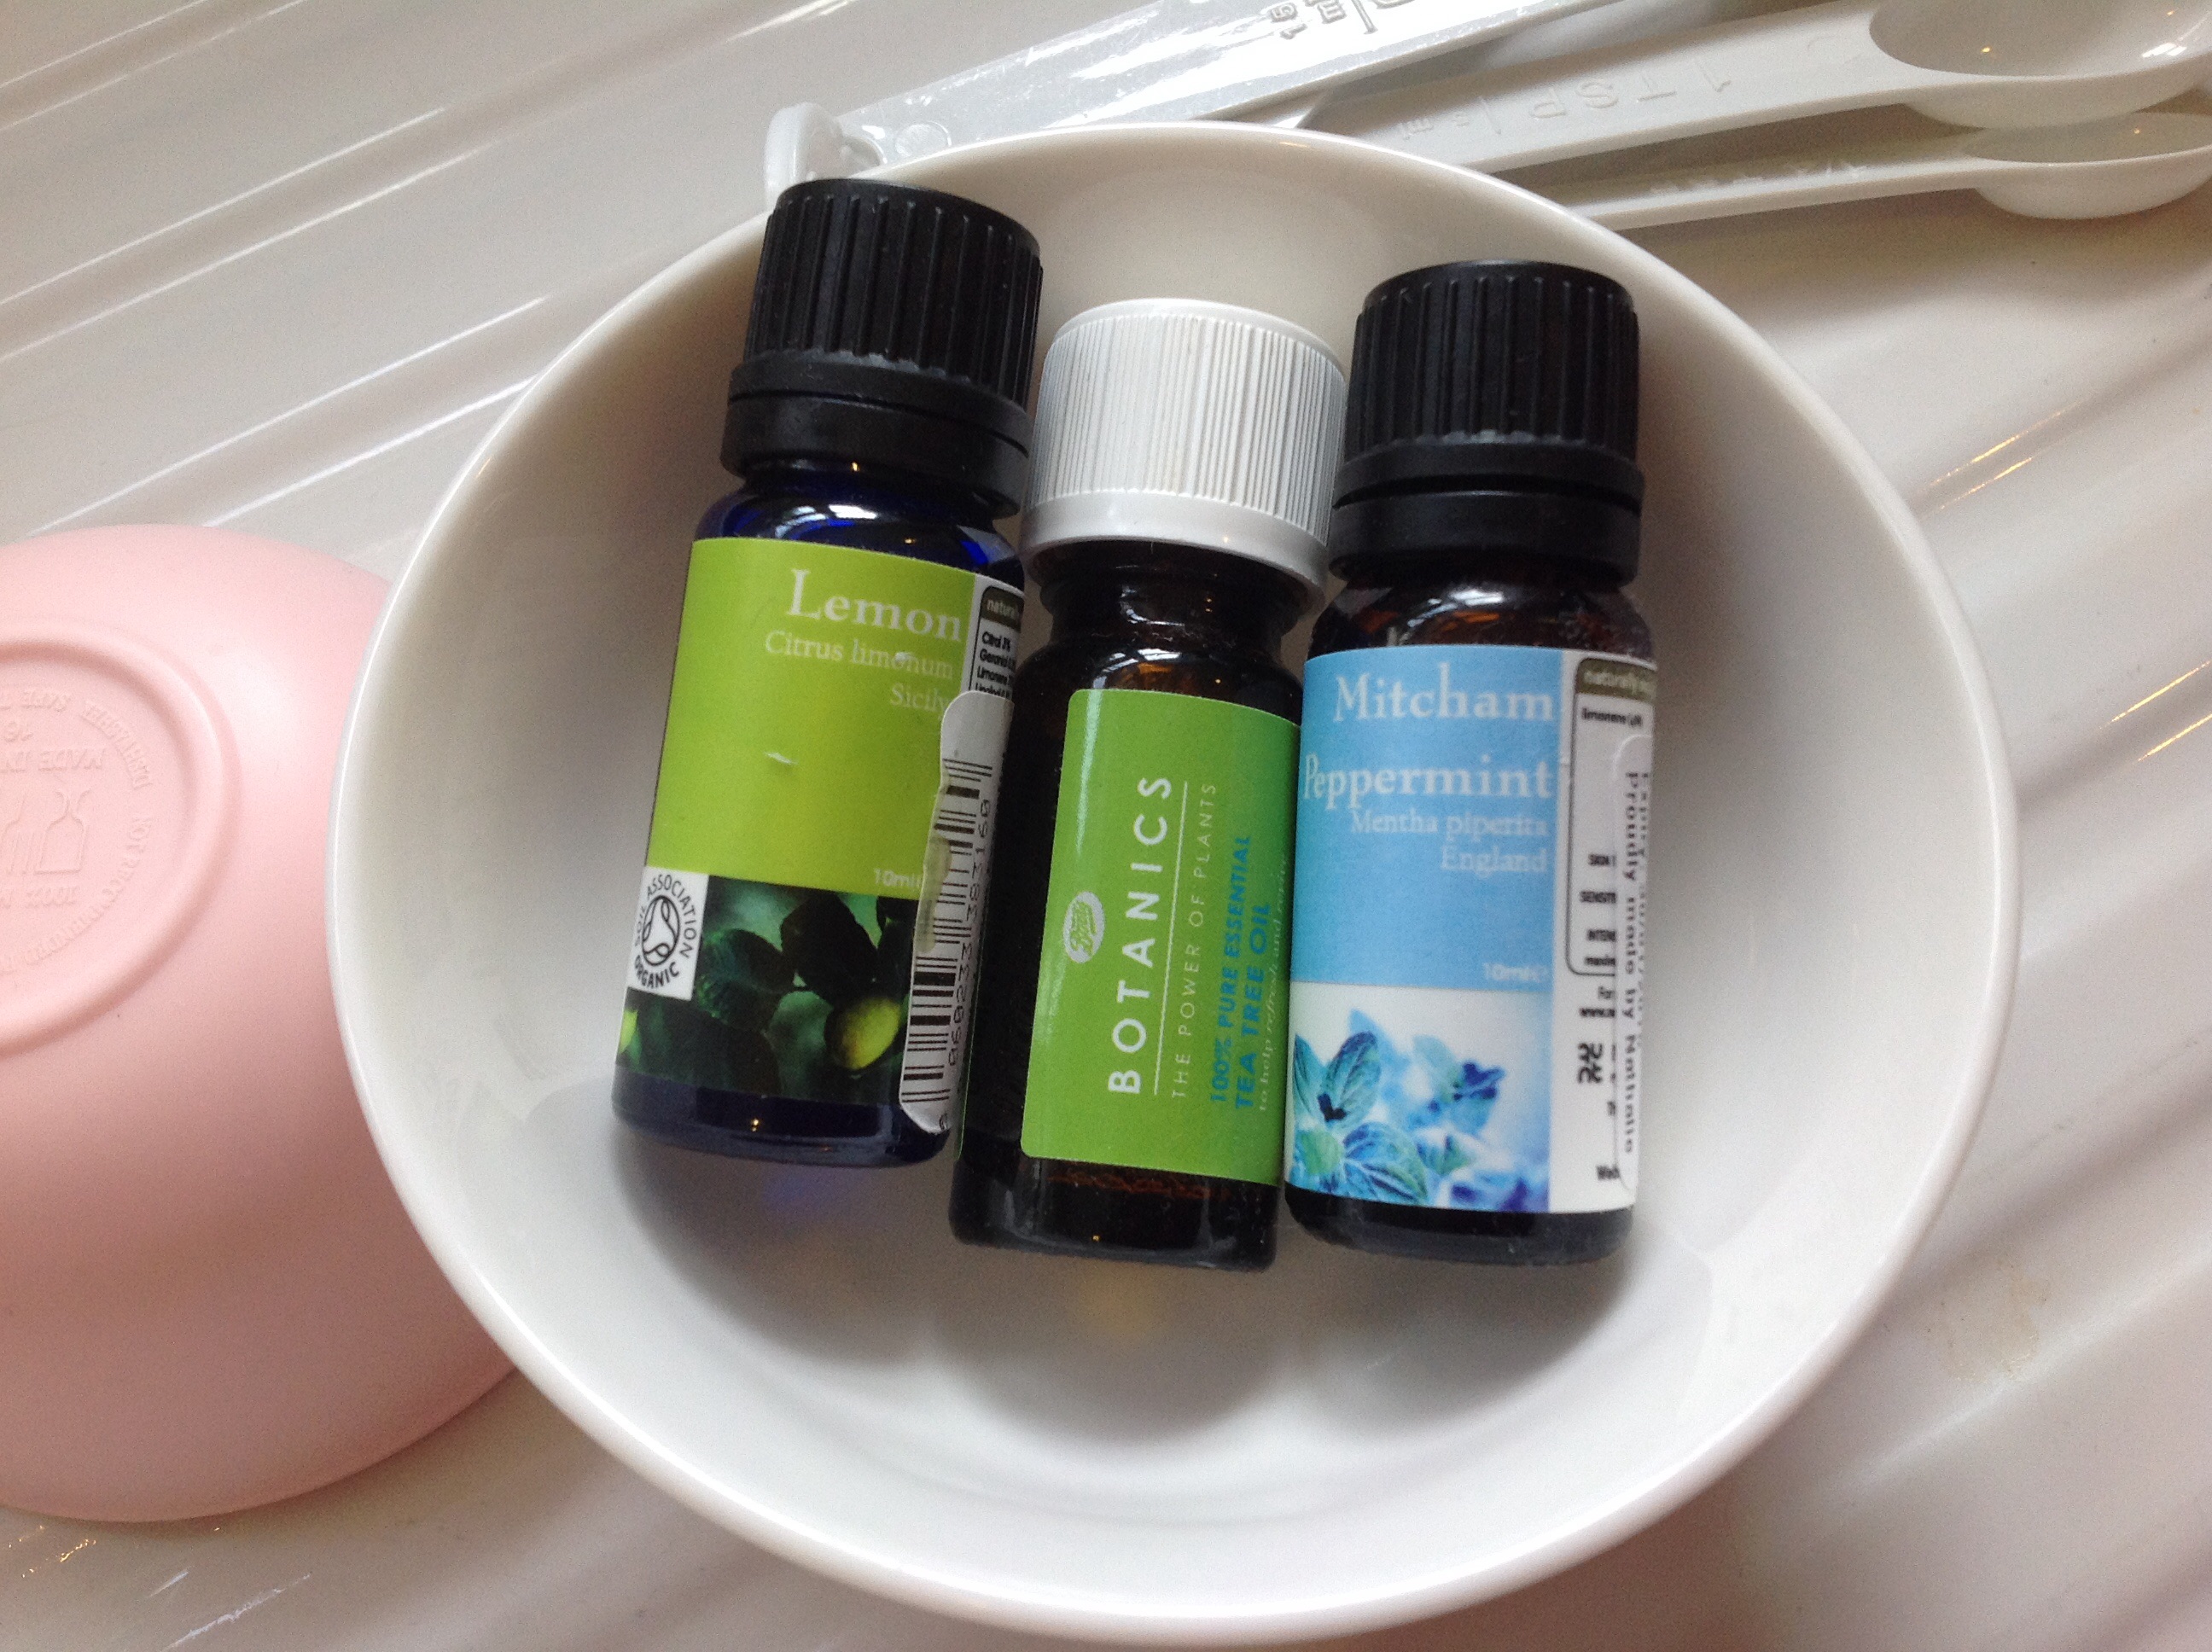
Lemon , Tea Tree and Mitcham Peppermint essential oil

Lemon, Tea Tree and Mitcham Peppermint essential oil

(If you want to make more than this just use the same proportions as above in larger quantity, or follow Clean Mama’s recipe)

As the blog post recommended adding essential oils, I chose lemon for its lovely citrus fragrance. It has antibacterial properties and has an uplifting scent.

Tea Tree Oil is sold in most pharmacies for its anti bacterial qualities.

Since I like the smell of Mitcham Peppermint essential oil, known for it’s antiviral properties, I used this as well.

A cleaning detox that means no more harsh chemicals around the house and a simpler way to clean.

I put equal amounts : 10 drops of lemon, 10 drops of Tea Tree and 10 drops of Peppermint oil in with the vinegar, water and alcohol.

As I’ve just finished an Ecover multi purpose cleaner in a spray bottle, I decided to recycle it for this home-made cleaner.

I rinsed it out with some water, put some bicarbonate of soda in and left it over night, rinsed it out to remove as much of the chemicals as possible. With all the ingredients added into the bottle, I put the top on and shook it up to make sure all the essential oils were combined into the other ingredients.

I’ve been using this home-made cleaner for about a month, it’s good on kitchen counters, sinks, baths and the loo.

Because the spray is homemade, I’ve not thought of cleaning so much of a chore now. In fact as I clean, I look and inspect to see whether the spray is cleaning as well as the shop bought cleaners available.

I think it does a better job. The sink and bath are shiny and there isn’t any streaking on the shiny chrome surfaces.

home detox

The air doesn’t have the heavy artificial fragrance of commercially bought cleaner and now that all the scents have had a chance to combine, I can smell the sweet uplifting scent of Peppermint and lemons. The bathrooms just seems fresher and the surfaces of the ceramic sinks look just as shiny.

Using the spray with a little Biocarb gets the grime lifted away far better than the commercial cleaners I’ve tried, so that’s reduced the number of cleaner products I use around the house and saved on storage and my wallet – Brilliant!

Do let me know if you have a cleaning tip / idea to try.