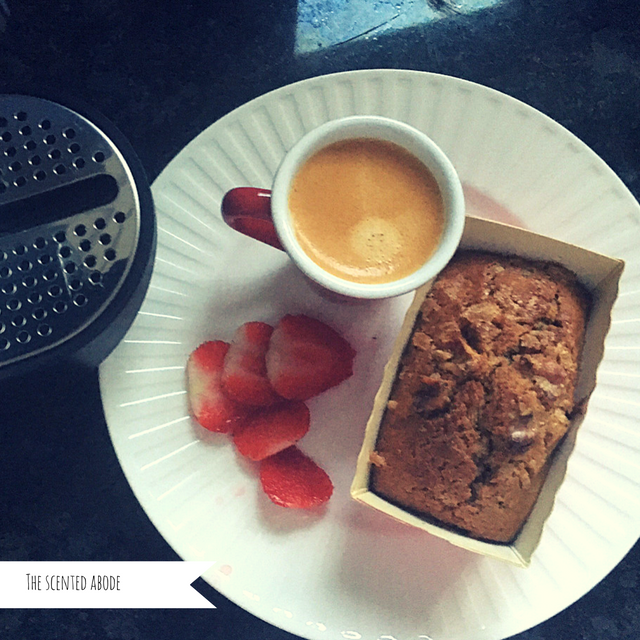
Nespresso machine for Coffee and Walnut Cake

image


We bought a Nespresso machine, an offer which really was too good to miss and now we have two coffee machines that sit on opposite sides of the kitchen.

The Dolce Gusto machine makes great coffee, it also makes lots of other great drinks which my kids enjoy, particularly the iced Cappuccino and iced tea, drinks which if we were going to Starbucks would cost a small fortune.


The Nespresso machine however, makes coffee an experience and I wish we had gotten around to getting earlier. If you are thinking about getting one of these machines, this month there is an offer too good to be missed. Not only is the machine on offer but the Aerochino machine is free. Yes that’s right free as long as you purchase their coffee pods from the website.

We’ve been in coffee heaven, and what better way to enjoy a cup of rich intense coffee, but with Coffee and Walnut cake.

This is a simple recipe – just use the Muffin mixture from this recipe and use just walnuts instead of the blueberries and cinnamon, add an espresso shot of coffee to the mix and bake.

That’s it. I used these cute cardboard mini loaf cases which I spotted in M&S, which were a perfect size for individual portions to serve for a tea time treat.

The Marzipan that turned into Blueberry Muffins


image

The month of May is almost over. In fact most of April and May has been filled with work, a decorating and a DIY project for my youngest, all of which has meant I’ve not written as regularly as I’d like for a while.

Its also meant a few ingredients that were meant for Easter were left as I didn’t get around to much in the way of baking. In previous years, this usually means I find them lurking in the back of the cupboard until one day, when I am looking for something else I come across it and it’s past its sell-by date and too late to do anything but throw it way. I then kick myself for the wasted food.

So, this year, when my youngest said she needed some photos to cakes to bring into school, so she could apply to join the baking club.

I decided not to repeat the mistakes of previous years. With the Marzipan that I bought, I looked for a simple cake recipe to turn it into something quick and simple.

There were loads of recipes which included ground almonds, which I didn’t have, I’d almost given up until I came across this one. A simple bake with cherries and poppy seeds.

Ok I didn’t have the tinned cherries, but I had some fresh blueberries that were destined for a fruit salad instead.

With sugar, eggs, self raising flour and some milk in the fridge, this would do the trick.Photo of ingredients such as Marzipan

Muffin Ingredients:

255g self raising flour
115g caster sugar or soft brown sugar. (I used a 50/50 mix of white and brown as I had this in my cupboard)
2tbsp poppy seeds
150g fresh blueberries or canned cherries without pips
115g golden marzipan, chilled in the fridge and grate coarsely
1 medium egg, beaten
50g butter or margarine, melted
175ml whole milk

To make:

Pre-heat oven to 190°C/375°F/Fan 170°C/Gas Mark 5.

Put some  muffin cases in a muffin or cupcake tin, to keep the shaped of the cakes.
Sift the flour into a mixing bowl, and stir in the sugar, poppy seeds, blueberries (washed) and the grated marzipan. I find that chilling the marzipan makes it a lot easier to grate.

You’ll need to either chop the marzipan or grate it so it can be distributed evenly in the cake mix. It will infused the cakes with the most lovely scent of almonds. Hmmm heaven.

Make a well in the centre.

Mix together the egg, melted butter with the milk. I used Soy Milk.

Pour into the well and mix to form a thick, rough batter. My youngest insisted at this point to put her hands into the batter to mix the batter.

We made a lot of mess by this time and she could tell that I wasn’t impressed with this technique as by this time she had lost interest and had gone to find something else to do.

Now that we had the batter, the mix was spooned into the muffin cases and put into the preheated oven for 22-25 mins, until risen and golden. Transfer to a wire rack to cool.

This part of the cooling process is tricky in our house, firstly it’s hard to resist the tempting smell of the cakes as they cool, but they also summon our two cats, who are also keen on the taste of freshly baked cakes. This means we have to guard them until they are ready to serve.

We took photos of the muffins and printed them so my youngest could take them to school. They were eaten for tea that afternoon.


What to do with a ripe juicy Pomegranate

image pomegranate seeds

Pomegranates are one of the fruits that I think of as very versatile. It wasn’t always so. I never really knew what to do with it other than throw it into a fruit salad. But of course you can add it as a lovely topping on Roast Lamb, or sprinkle some into a plain yoghurt with breakfast cereal. l like to sprinkle them over chocolate ice cream.

A few years ago, a friend invited me to an impromptu lunch at her house. We’d been to a meeting together and on our way home, she collected a few groceries and invited me to lunch. As she started to make the colourful salad, she took out the reddest pomegranate I’d ever seen, cut it open and tapped some of the seeds out over the bowl of salad. A drizzle of Olive oil and orange juice dressed the salad. It was delicious.

So when I saw these huge Pomegranates in the green grocers, ripe and gorgeous I bought one along with some large oranges.

If you are looking for something easy to make, this lovely refreshing orange and Pomegrante fruit juice takes just a few minutes to make.

Squeeze some fresh Oranges into a jug. I stuck a sieve over the top of the jug to keep the pips and pith from falling in. Two Oranges, some mango juice I had in the fridge made it into this drink. I added some fizzy mineral water and then swirled in about two tablespoons of Pomegrante seeds into the sparkling juice. It frothed to the top of the jug just in time to serve with some ice. Enjoy!

Home Made Apricot scones infused with Rose Pouchong tea


Apricot Scone infused with Rose Pouchong tea


When we visited Fortnum and Masons, I noticed  lovely jar of Rose Pouchong infused Apricot conserve, which is the inspiration for these apricot and Rose scented Scone recipe.

Scones are so easy to make, and they are better freshly baked, eaten slightly warm with a big pot of tea, jam and whipped cream. I can’t think of anything better to cheer up a dull cold afternoon.

Here are the ingredients for home made scones:

50grams of dried apricots (diced into small pieces about the size of a raisin. Soak the dried apricots in a strongly brewed dark Rose Pouchong Tea overnight. Drain and remove all the excess liquid.

40grams of room temperature butter

225grams of self-raising flour

1.5 level tablespoons of caster sugar, a little more if you prefer the scones to be sweeter to taste.

A pinch of salt

110ml milk (this can be soy milk if you prefer)

A little extra flour for rolling and dusting the scones with.

To make the scones, preheat the oven to 220 degrees Celsius.

The mixture should be made as light as possible, sieve the flour into a bowl. Cut the butter into the flour and rub into the flour as if making pastry. Aim for a light fine crumbly mixture. It’s very important to get the butter combined in well with the flour, next add the sugar and salt and mix well.

Slowly add the milk and then add in the pieces of apricots. By pre soaking the dried apricots overnight in the Rose scented tea, they have taken on the wonderfully aromatic floral qualities of the tea. This is enough to add just the subtlest hint of Rose to the scones.

If you want the scones more fragrant, add a couple of drops of Rosewater. Continue to add the milk and then combine into a soft dough.

Roll the dough out on a well floured pastry board. As my work tops are made of granite, I dusted this with plenty of flour and rolled them out with a well dusted rolling-pin. The dough should be rolled out to the thickness of about 2cm or thicker if you want high-rise scones. I’ve rolled these out to about 2cm and then used a large round cutter to cut out 8 scones.

Lay them out on a well buttered baking tray.

I then sprinkled some granulated sugar and dusted the scones with some flour.

Next, pop the baking tray(s)  into the preheated oven (220 degrees Celsius) for 15-20 minutes until the scones look warm and golden in colour.

Cool them on a baking rack.

Best served freshly baked and still warm from the oven with a pot of tea, with Jam (apricot or marmalade is delicious with these scones) and  cream, clotted if you want to be extra indulgent.


Morning Espresso


Espresso - limited edition


I think it’s the little things, small pleasures that keep you going.

Since we received a Dolce Gusto coffee machine, I have come to appreciate a small hit of caffeine to kick start my day.

We’ve been trying out all sorts from the Dolce Gusto range, both from the online shop as well as the ones you can find in the supermarket.

As I’m not keen on lattes, being a little too milky, I much prefer strong black coffee. The one that I like most is the limited edition Yunnan espresso. This little capsule is only available from  the online shop.

I had never heard or read about coffee grown in China. Like most people I associate tea with China, so it was so lovely to discover a coffee grown in a climate and location of dramatic mountain ranges. Imagine these as the scene to wake up to, where rice is grown on man made terraces on mountains. It must be such an experience. It’s going on my bucket list now as a place to visit.

The coffee itself is distinctive due to its light fruitiness. Even though it’s an intense Esspresso, I think it smells light and refreshing. The texture of the coffee is delicate yet rich and powerful, a combination which reminds me of the Yin and Yang symbol, a balance of light and dark.

In a few days it will be time to celebrate Chinese New Year. I can’t wait… We’ve always celebrated. The last two years, venturing into China Town to see the dragon dancing in the streets in London and eating in one of the nearby restaurants. It’s become a bit of a tradition for our family.


Lemony Ginger Nuts


These lemony ginger nuts are the perfect way to counter gloomy weather. When the weather gets cold, our oven gets busy with lots of baking to fill the air with the delicious scent of home-baked biscuits.

This recipe is adapted from Delia Online and has been a favourite, since my eldest made them for one of her homework assignments for school.

As we had plenty of Golden Syrup, ginger and lemons, I decided that the lemons would bring a lovely citrusy tang to the ginger nuts.

Ingredients:

Zest of one lemon and about a dessert spoon  of lemon juice

110grams of Self Raising Flour

1 slightly rounded teaspoon of ground ginger

1 level teaspoon of biocarb of soda

40g soft brown sugar

50g butter

2 tablespoon of golden syrup

Preheat oven to 190degree c or Gas mark 5


To make:

Sieve the flour, biocarbonate, ground ginger into a bowl, add the lemon zest and combine. With your hands, rub the softened butter into the mixture until it resembles rubble.

Add the lemon juice, and the golden syrup, combine this into a dough. (You may need to add a little flour at this stage if the dough feels too wet or sticky. The consistency you are aiming for is something resembling short crust pastry. Form the dough into a ball and divide in half, then half again and cut into four. This should make 16 small pieces of dough.Lemon and ginger nuts - dough

Rub plenty of butter onto a non stick baking tray. Next place the small pieces of dough on to the baking tray and flatten them slightly. Leave plenty of room between each and put into the preheated oven for 10-15 minutes.

When they come out of the oven they will be soft. Leave them to cool a little before transferring them to a wire rack to cool completely.

All that remains is to enjoy with a lovely cup of tea. They took all of half an hour to make and bake. Even better was that the lingering scent of ginger and lemons was in our house for the rest of the afternoon.


Christmas Muffins


Christmas would not be complete without Mince Pies. This year, I had an idea to make these Christmas Muffins. Perfect for Breakfast on Boxing day.

I love their freshly baked scent of Cinnamon filling the house. A lovely way to start the day with a fresh muffin and coffee.

Very easy to make. Just follow the recipe for the fresh Blueberry Muffins and substitute the Blueberries with Mincemeat.

Rather than adding the mincemeat and mixing it into the bake, add little dollops into the muffin tins alternating between the batter and the mincemeat until all the mincemeat has been added into the Muffin mix. Bake as normal.

Merry Christmas!


Chocolate Magic Cake

Magic Chocolate CakeA few weeks ago, I came across an article in a newspaper about a new cake recipe that was fast becoming the next big thing, after cupcakes, macaroons and pop cakes.

Magic cakes apparently are cakes that have three different layers of textures, a crumbly cake layer beneath which sits a custard textured layer which sits on top of another layer of cake.

It is the chemistry or is it alchemy, that creates the layers out of a single mix.

The article and recipe idea described was so tempting, that I had to give it a try, aside from the fact that I love anything with Chocolate.

Before making the cake, it’s helpful to check out this feature on YouTube, as I had no idea what kind of consistency the final batter should be, my first attempt at this cake didn’t quite achieve the three layers.

I got a very thin layer the first time I tried, it was still a very tasty cake and filled my house with the beautiful scent of vanilla and chocolate. I don’t think there is a more heavenly scent than a hot oven with chocolate cake baking inside.

So for ingredients, as the recipe called for a lot of milk, I’ve substituted this for Almond Milk, as my hubby reacts badly to cow’s milk.

He gets what I can only describe as a man headache, like man flu and has to lie down in a darkened room until it goes away.

So, to avoid a headache, it’s Almond milk that I’m using in this recipe, but you can, of course, use cows milk as normal.White Vinegar in Magic Chocolate Cake recipe

The second time, I tried this bake, I added a small amount of white vinegar to the egg whites. I omitted this the first time, as I wasn’t sure about the idea of using vinegar, in case it wouldn’t taste very good. You can’t taste anything but sweetness and chocolate in the final cake.

You will also need a whisk and 3 mixing bowls. One for the egg whites, one for sifting flour and cocoa and one to mix it all together.

Now for the ingredients:

113g Butter

600ml Warm Milk (I used Almond milk)

115g Plain Flour

1 teaspoon baking powder

43g Cocoa powder

30ml Dark Espresso (I used powdered decaff)

4 eggs

4 drops white vinegar

210g soft brown sugar

1-2 drops Vanilla essence

8″x8″ dish


To make:

Preheat the oven at 165c

Soften/melt the butter

Whisk the flour and cocoa powder together

Separate and whip the egg whites until it becomes stiff as if making a meringue.

Beat egg yolks and sugar, beat in melted butter and the espresso mixture and the vanilla essence, then mix the flour and cocoa with the baking powder into the batter. Gently mix in the warm milk and gently fold in the stiff egg whites a third at a time.

It will look like a lumpy thick batter, not like a cake mix but a very thick milkshake kind of consistency.

Pour this into the prepared pan (I lined my square cake tin with greaseproof paper.

Bake at 325f/165c for 50-60 minutes.

When you get it out of the oven, the mixture may wobble a little, this is normal for this type of cake. The first time I made this cake, I wasn’t convinced and put it back in several times, but after about three times in the oven I was convinced that the wobble was expected and the cake was in fact cooked.

The second time around, it looked perfect.

Leave to cool completely.

Dust with Icing Sugar and add some fresh fruit to serve.

Hmmm, I think I’ll go and have another slice!


Smells and tastes better than it looks – Orange Chocolate and Cinnamon Cake

Orange, Cinnamon Chocolate Cake

This rather messy looking cake, smells and tastes so wonderful because it is full of the warming scents of Orange, Cinnamon Spice and Chocolate.

Having found two 20cm spring form cake tins, this would make a simple sponge layered cake with a thickly indulgent butter cream icing.

Ingredients for the Orange Chocolate cake:

200g Caster Sugar

200g softened butter

4tsp Orange Juice

5tsp Coca Powder

1 tsp Ground Cinnamon Powder

3 Beaten Eggs

200g Plain Flour

2 tsp Baking Powder and the Zest of 2 large Seville Oranges

Orange Marmalade (for the filling)

For the Butter Cream filling:

(I have made this using a Sunflower Margarine as my hubby doesn’t get on well with Cows Milk, and used a dash of Orange Juice)

Icing Sugar (about twice the volume to the butter)

Butter or Marge

Pinch of Salt

Orange Zest

1 tablespoon of Milk/Orange Juice to taste and loosen the consistency of the filling to your desired consistency

To make:

Preheat oven to 180 degrees

Mix together the softened butter and sugar until the mixture is light and fluffy. I mixed it together with a spoon rather than used an electric whisk.

Heat orange juice and then mix in 4 tablespoons of the Coca Powder to form a paste and add to the Sugar and Butter mixture, add the rest of the Coca Powder into the mixture and mix until all the ingredients are combined.

Beat in the 3 whisked eggs a little at a time until the mixture has combined to form a batter like mixture.

In a bowl add in the Strong Flour, Baking Powder Cinnamon and Grated Zest of Orange and combine. Sift this mixture into the batter like mixture and gently fold into the mixture until the two have combined into a thick cake mix.

Divide evenly between 2 Cake Tins (20cm wide). I have lined these with Grease proof paper, to help ease the cake out of the tins.

Bake in the oven for about 25-30 minutes. You’ll know the cake is ready when you put a skewer through and it comes out clean.

Cool the cakes on a baking rack.

I found a tip in one of Delia’s recipe books about how to remove cakes from a spring form cake tin. Put the cake on top of a tin can and push the side of the cake tin down, it should slide off the cake, leaving the cake on the base. Use a pallet knife and gently remove from the base of the tin.

Put a tea towel over the baking rack so that you don’t get lines on the cake. (I didn’t do this bit as I thought the lines would be inside the middle of the cake.

It will take about 20 minutes for the cake to cool completely.Slice of Orange Chocolate Cake with Cinnamon

For the Buttermilk filling – I made this orangey by grating the zest off another orange and adding this to the marge. Combine in Icing sugar and keep mixing/adding icing sugar until you get the consistency you want for the cake. I added a splash of orange juice as well as some Soya Milk to make the consistency a little gooey.

Once you have the filling made, spread a thin layer of Marmalade on each side of the cakes and spread the buttermilk filling on top. Sandwich the cake together, dust icing sugar on top and the cake is ready to serve.

For people who like to decorate, the cake would look great with butter icing on top and some of those jellied orange segments or fresh oranges to decorate. But I was too eager to eat the cake, so were the kids, so it just got a coating of icing sugar before being served for last night’s tea.

Hmmm delicious!

Seriously easy chocolate loaf cake

Chocolate Loaf cake

I’ve been working on the chocolate magic cake, the one where you mix the ingredients together and in one bake, a magical transformation happens during the baking and the cake mix changes into three layers, the middle is a rich chocolate custard. The only thing is, I haven’t got it quite right and it takes a lot of ingredients not to mention washing up involved.

So, whilst the effort will pay off eventually, what I wanted to do yesterday was to make something seriously simple and easy, but also rich, indulgent and fill the house with a chocolatey aroma that’s warm and comforting.

Looking through all the cookery books, I found a recipe that fulfilled all the requirements, everything in a store cupboard, and a seriously easy, no effort bake.

Hidden within Nigella’s feast recipe for Halloween called Ghoul-Graveyard cake, was the chocolate cake ingredients, all of which are in my store cupboard and fridge:

Ingredients:

250ml milk

1 teaspoon white wine vinegar (white distilled vinegar will work too)

225g plain flour

50g coca

2 teaspoon baking powder

1/2 teaspoon bicarbonate of soda

200g caster sugar/soft brown sugar

110g softened butter

2 eggs

1 teaspoon of real vanilla extract

To make the Chocolate Loaf Cake:

Put all the ingredients, except for the milk and vinegar in a food processor and blitz into a soft dough.

Scrape the sides down and pour in the milk and vinegar slowly (milk and vinegar should be combined in a small jug – you’ll find that as the vinegar is added the milk starts to curdle, this is ok and I’d say looks like and has a similar consistency to buttermilk).

Once all the ingredients are combined pour into a cake tin. The instructions were for a 26 cm spring form cake tin.

As I didn’t have one to hand and I didn’t want to grease the square cake tin I had – this would have required effort…. I used a loaf tin with a paper case lining. No effort again, just poured the cake mix into the loaf tin.

In a preheated oven, I left the tin to bake for 45 mins on gas mark 3 (170c)

That’s all there is to making this cake. Once cooled, dust with some icing sugar. It doesn’t need much as it’s the richness of the chocolate thats lovely about this cake recipe.

The only thing left to do is, serve it, with a mug of hot chocolate to make it a proper guilt trip of chocolatey indulgence.